
Skip To...
After the wonderful Arcadion raids, FFXIV 7.1 brought Jeuno: The First Walk, which is the beginning of Dawntrail‘s brand-new Alliance Raid series. This time, it is FFXI‘s turn to get a crossover with Final Fantasy‘s other MMO. With new story quests tying both games and some of the most surprising fights in Dawntrail, fans of this game will want to return to try their hand at beating these new foes. Speaking of which, we’ve prepared a quick guide to help you with each boss, and trust us; you’ll likely need it because Jeuno has some of the most challenging encounters in Final Fantasy 14.
How To Unlock Jeuno: The First Walk
Before you enter the new instance, you must meet a few requirements, which shouldn’t be too hard, especially if you’ve been playing since the expansion launched.
- Complete Dawntrail‘s MSQ.
- Reach level 100 with any combat job.
- Have at least an item level of 695.
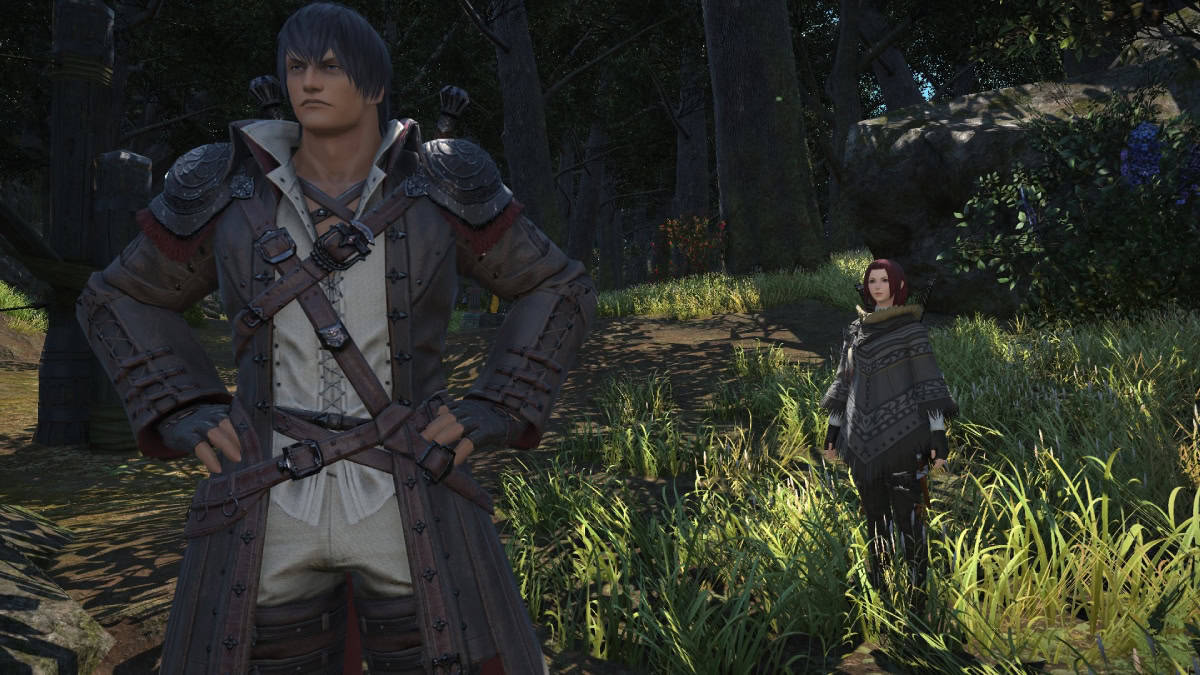
Once you have those things, head to Tuliyollal’s Aetheryte and speak with the NPC next to it to begin the quest line. After meeting everyone’s favorite two-headed warrior from the expansion and a well-known Final Fantasy XI character, you’ll have access to Jeuno: The First Walk in FFXIV.
Prishe of the Distant Chains
Prishe will be the first boss of Jeuno: The First Walk, and contrary to other enemies who open an Alliance Raid series, this one’s got hands (no pun intended).
As soon as the fight begins, Prishe will open with Banishga, a raid-wide attack. Heal as needed.

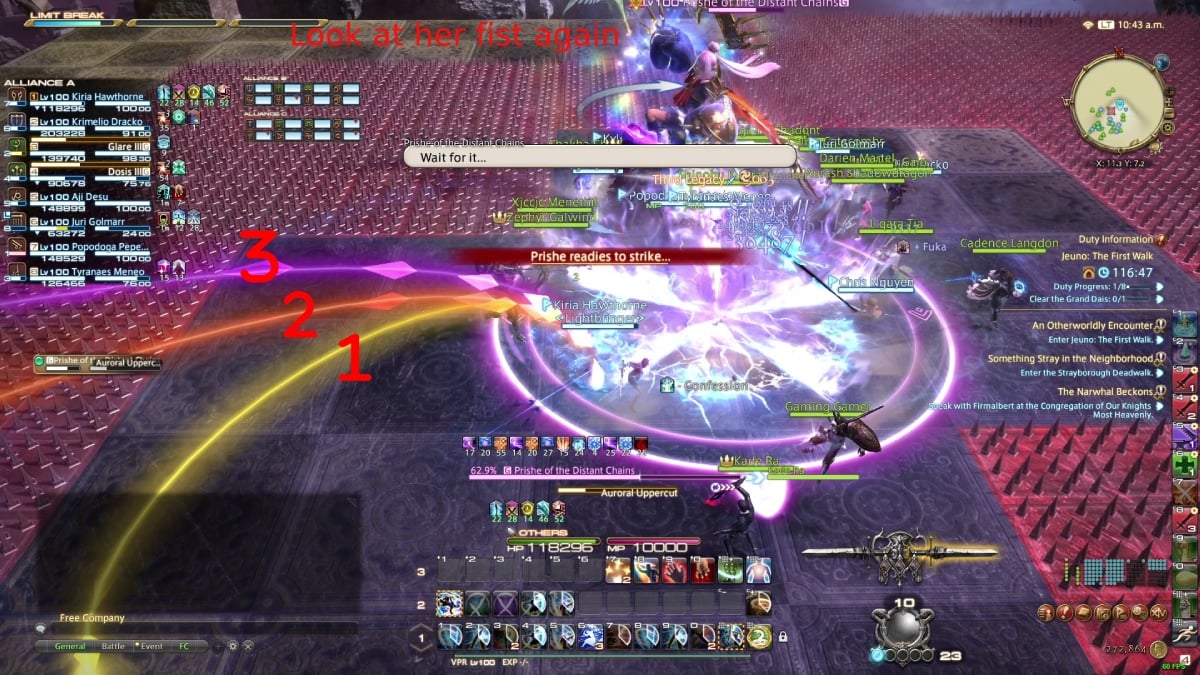
Knuckle Sandwich
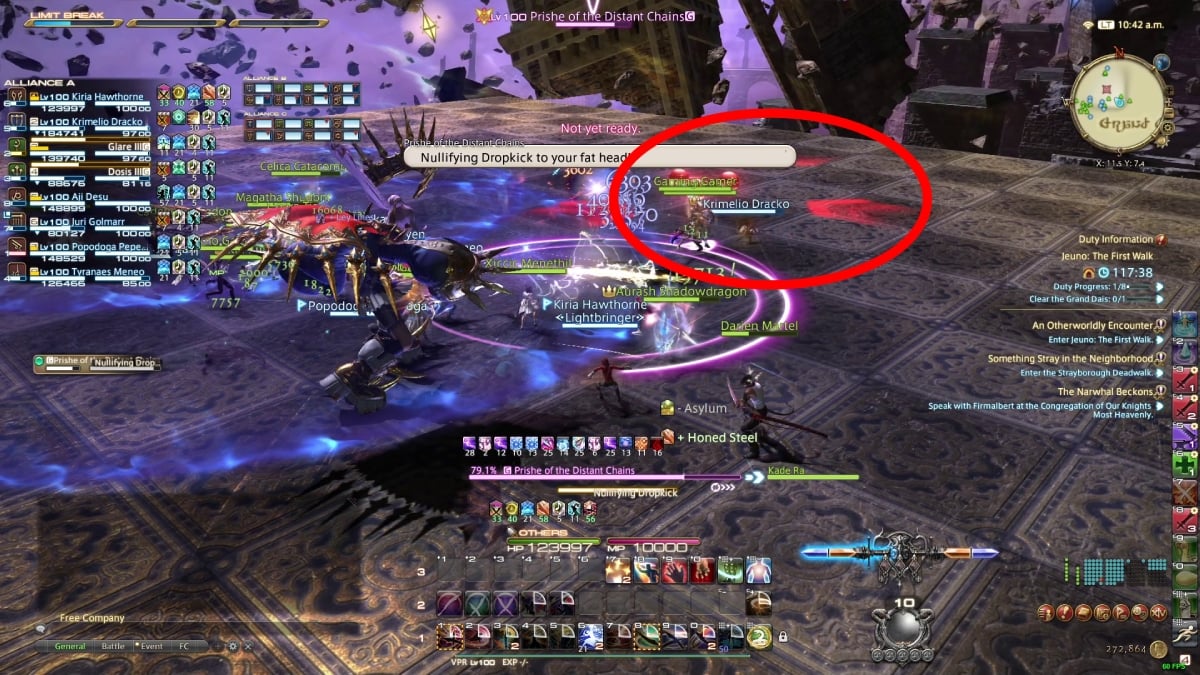
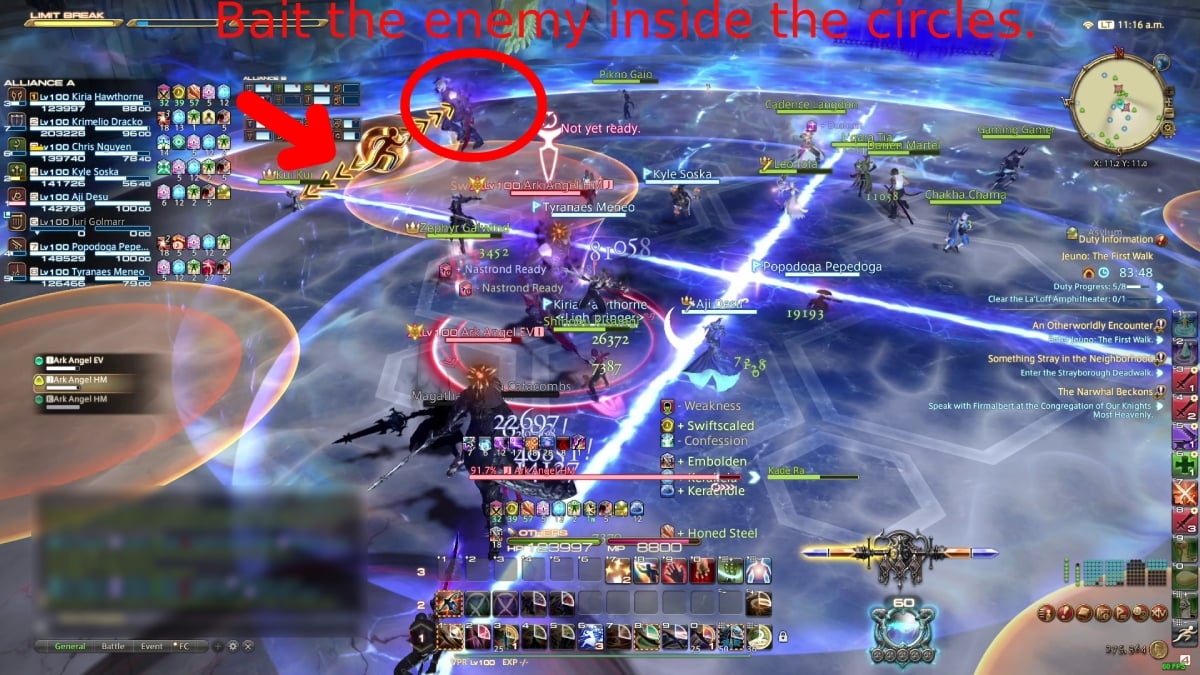
The first mechanic won’t take long to kick off, and it is called Knuckle Sandwich. This mechanic will be new for many, and the gimmick relies on paying attention to Prishe’s first.

As you can see in the above image, I’ve marked the three circles with three different numbers, as well as her first. You need to watch out for how many times Prishe moves her fist, which indicates the circles that will explode. For example, if Prishe moves her first twice, you need to be in the third circle to avoid damage. If she winds up the move three times, you need to exit all circles. After she attacks, move to the center because she’ll fire a donut-shaped AoE around her.
Nullifying Dropkick
This move is quite easy and will only affect tanks. Prishe will cast a double tank-buster, so two tanks need to soak this one. If you’re the tank, stay away from the party to avoid any unnecessary splash damage.
Banish Storm
This next move might throw a few players off due to the new markers. When Prishe finishes casting this spell, staves will appear on the ground. You’ll notice they have arrows pointing in different directions. These arrows indicate an AoE attack that will go off from the arrow’s starting point and outward. To avoid the move, pay attention to where the arrows are pointing and move away from them.
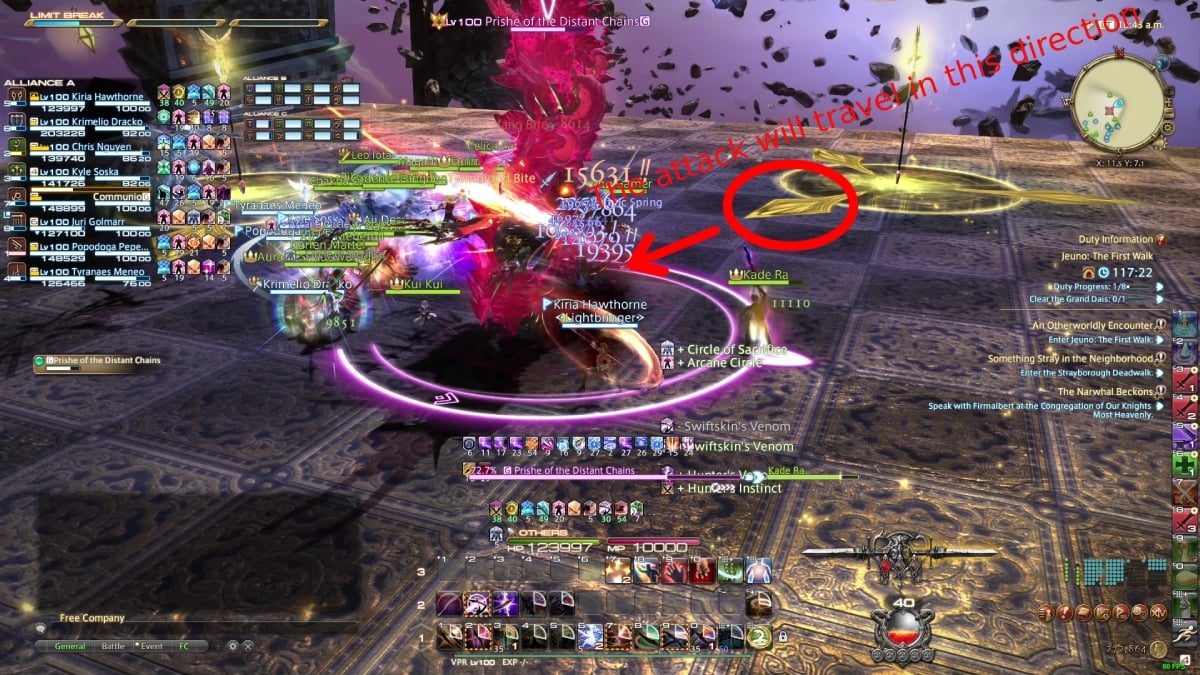
Soon after, certain Alliance members will get an AoE marker above them, so spread out to avoid splash damage. This AoE marker attack hits really hard, so if you’re at 50% HP or lower, you’ll likely die.
Crystalline Thorns & Auroral Uppercut
The next mechanic can be a bit confusing, but if you’ve mastered Knuckle Sandwich, it won’t be too hard. Similar to the aforementioned one, Prishe will wind up her attack before throwing her fist at players. However, you have the ground covered with spikes this time, which means you need to position yourself correctly.
As you can see, you’ll get three lines. Each of them indicates how far you’ll be thrown after getting hit. If Prishe winds up her attack twice, you’ll need to pay attention to where the second line ends and position yourself accordingly. Regardless of how far you’ll get thrown, try to land away from the spikes but inside the arena.
Banishga IV
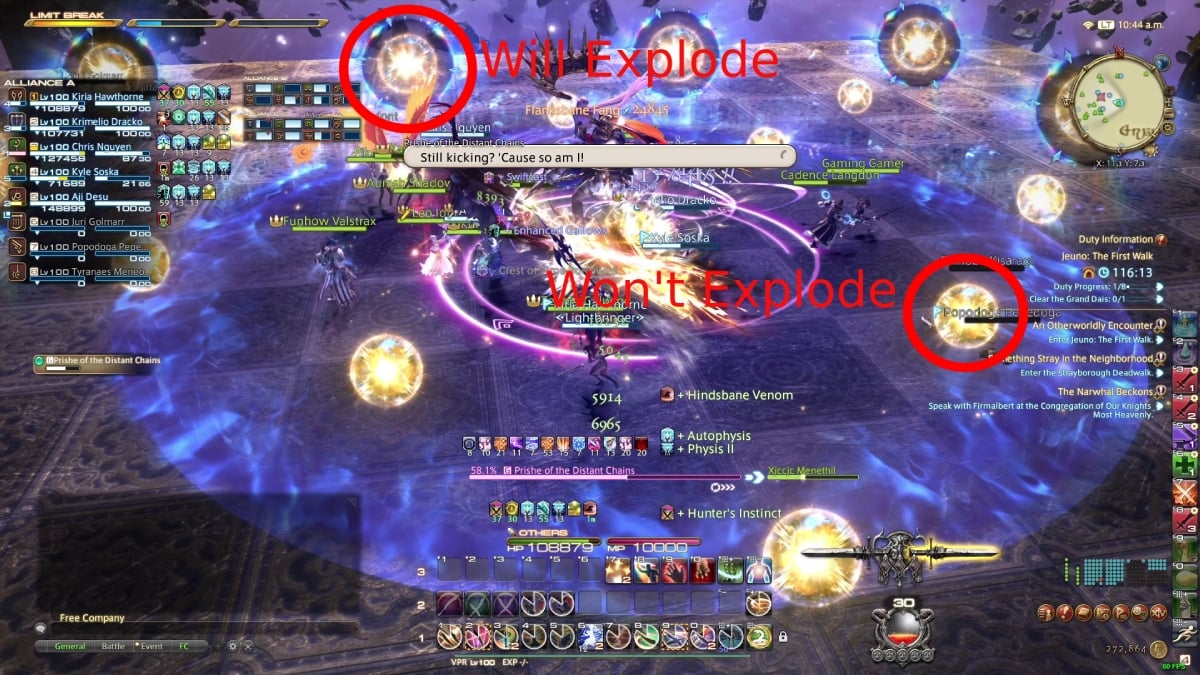
The next AoE mechanic is Banishga IV, which will summon light spheres to the arena. Certain spheres will start growing, meaning they will explode first. To avoid the attack, stay next to a small sphere and then move to the spots where the other spheres have just exploded. This attack by itself isn’t too hard, but it can get challenging once it gets mixed with other moves.
Other Move Combinations
Throughout the fight, you’ll get variations of the above moves. These are some of the ones I got during my encounter:
- Crystalline Thorns + Banish Storm + Auroral Uppercut
- Stay inside the area without spikes and locate the arrows. Find a safe spot where the AoE circles won’t hit you. Right after the area attacks go off, she’ll cast Auroral Uppercut, so follow the above technique to land correctly.
- Knuckle Sandwich + Banishga IV
- This one isn’t too challenging, and all you need to do is look at Prishe’s first, then move to a safe spot without an exploding sphere.
Between these moves, she’ll cast a few AoE moves with stack markers, so get together as a party and mitigate the damage. Fortunately, she repeats most of the moves I’ve listed, so the rest should be easy.
Fafnir the Forgotten
After a quick pack of enemies, you’ll reach Fafnir the Forgotten, the second boss in FFXIV‘s Jeuno: The First Walk. This one is much more difficult than Prishe and might actually be the most challenging boss of the raid. As always, the fight will begin with a raid-wide attack (Dark Matter Blast) and move on to the first new mechanic.
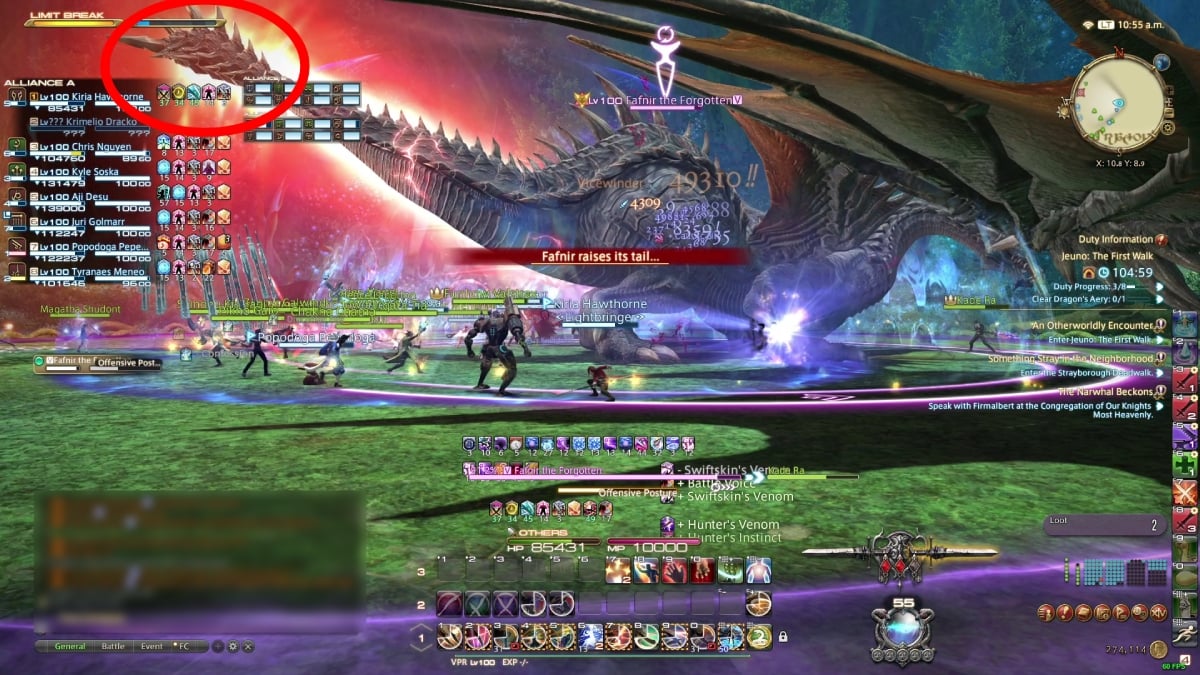
Offensive Posture
This attack will have different variations, one with its tail and one where the dragon hovers and lands. For the first, Fafnir will raise its tail to create a large V-shaped attack. This one takes up a lot of the arena, so the best way to avoid it is by standing in front of Fafnir’s face.
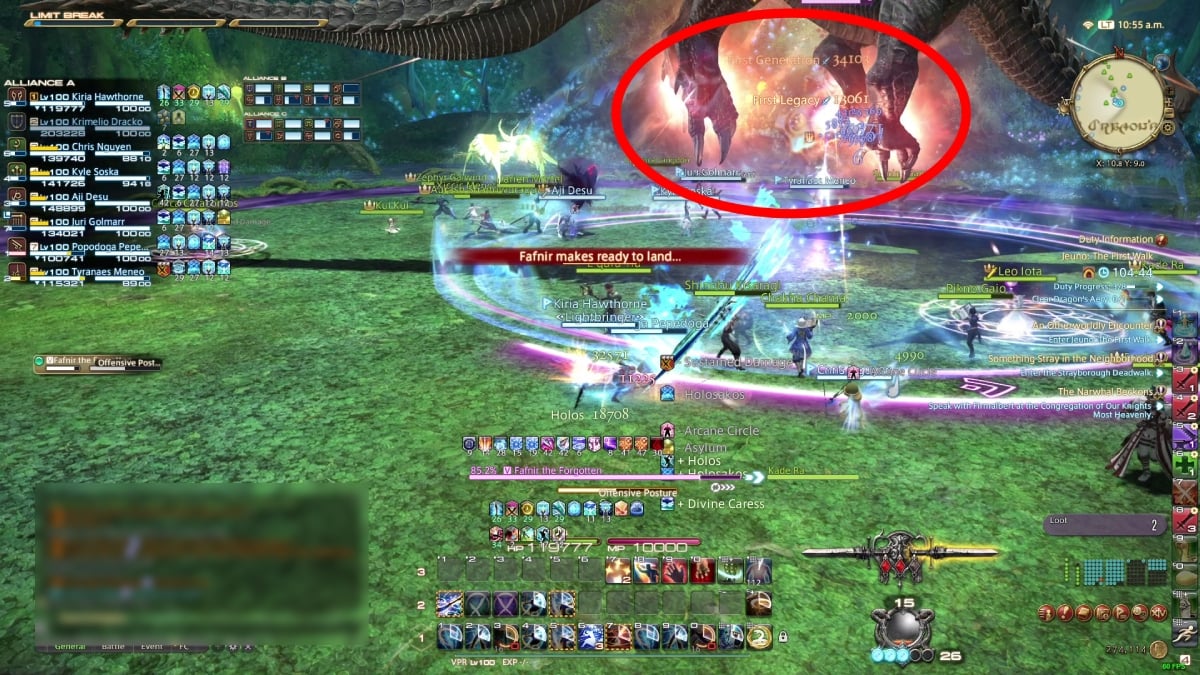
For the second one, Fafnif will hover over the ground for a bit before landing and dealing damage in a large area below it. To avoid this attack, run to the edge of the arena before the dragon lands.
The next variation will see Fafnif charging up its fire breath. Initially, it might seem like it will shoot in front of him, but that’s not the case. Fafnir will ignite the edge of the arena, so run inside to avoid the flames and a probably insta-kill hit.
After the fire breath variation, Fafnir will cast Offensive Posture again and will clear a small area from flames. You need to pay attention to the edge that doesn’t have fire on it and move toward it to avoid the AoE attack.
Once that’s done, Fafnir will repeat another Offensive Posture move, so position yourself accordingly.
Intermission
Soon after the Offensive Posture mayhem, Fafnir will cast a stacking spell and a few tank-busters. Get together or spread out, depending on the move. Once that’s done, get ready for the chaotic part of the raid.
Hurricane Wing
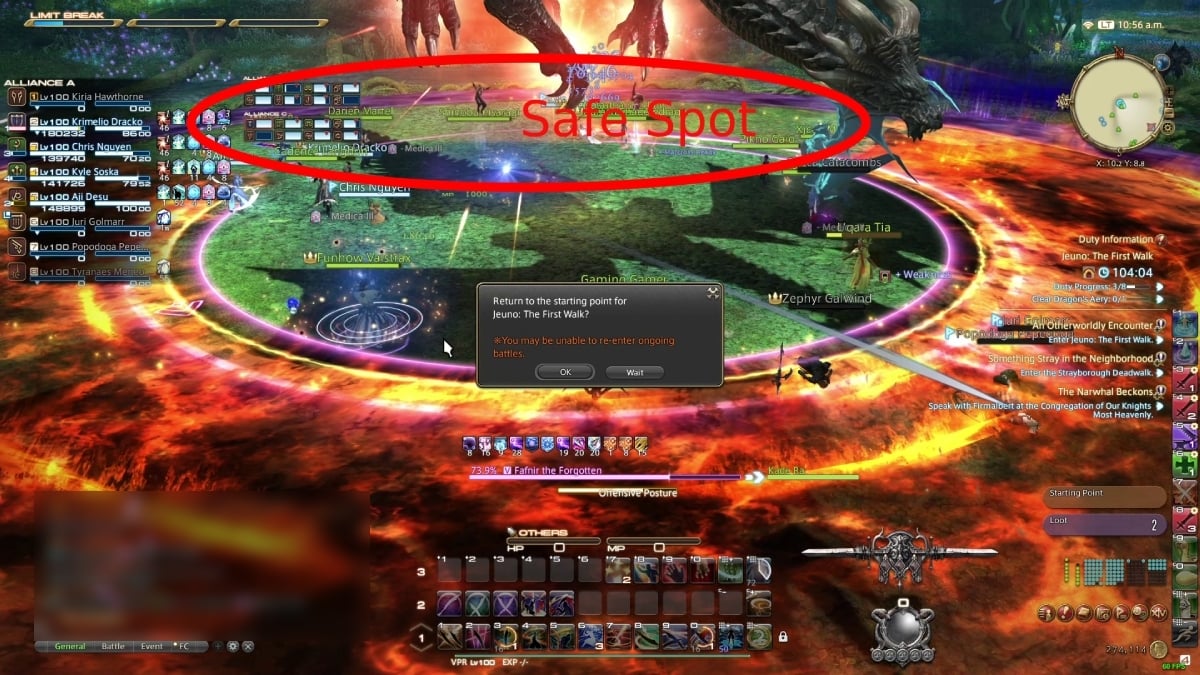
We’ve now moved on to the most challenging part of the raid. First, Fafnir will summon Darters. Defeat them ASAP. As you fight the enemies, the dragon will cast Hurricane Wing, which will do raid-wide damage multiple times. Once the cast is over, you’ll notice the arena’s edge will change a bit.
The raid will become an AoE-fest, where you’ll have to avoid different attacks. First, you’ll notice the edge markers with arrows, indicating the attack will travel inward.

After that, new circles will appear. A few large ones and a few small ones. Both will summon hurricanes of the respective side, and you need to avoid them at all costs. Running into a large hurricane will throw you up in the air, killing you instantly.
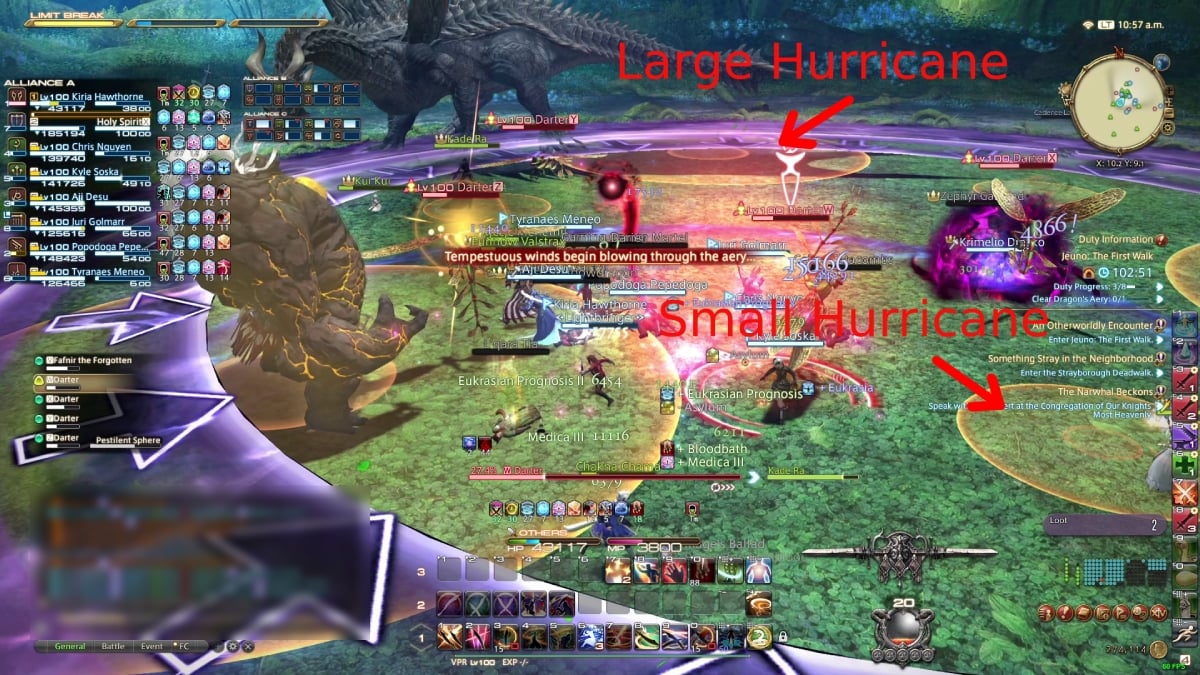
You’ll also see a few large AoE markers above some players, and the Darters, who are still alive, will cause a lot of area-wide damage. It is important to spread out while also keeping an eye out for the smaller enemies, as they can cause a wipe, too.
Second Intermission
Once the hurricane debacle is over, Fafnir will cast a few line-shaped stack attacks, so line up to handle them. Also, you’ll see Fafnir throwing a few Pestilent Spheres, which are just small AoE attacks and are easy to avoid.
Absolute Terror
Fafnir will locate itself at the edge of the arena and will do one of the two things. Either attack in a line-shaped way, hitting the center of the arena, or it will raise its wings to attack the sides of the arena. Between those moves, you’ll also get a few Darters to make things interesting. So, eliminate the enemies before focusing on Fafnir again.
Once that’s over, Fafnir will start combining moves from the Intermission phases with either Hurricane Wing or Offensive Posture. Here, the fight becomes a dodge-fest, so as long as you know how to evade the previous attacks, you’ll be good.
Ark Angels
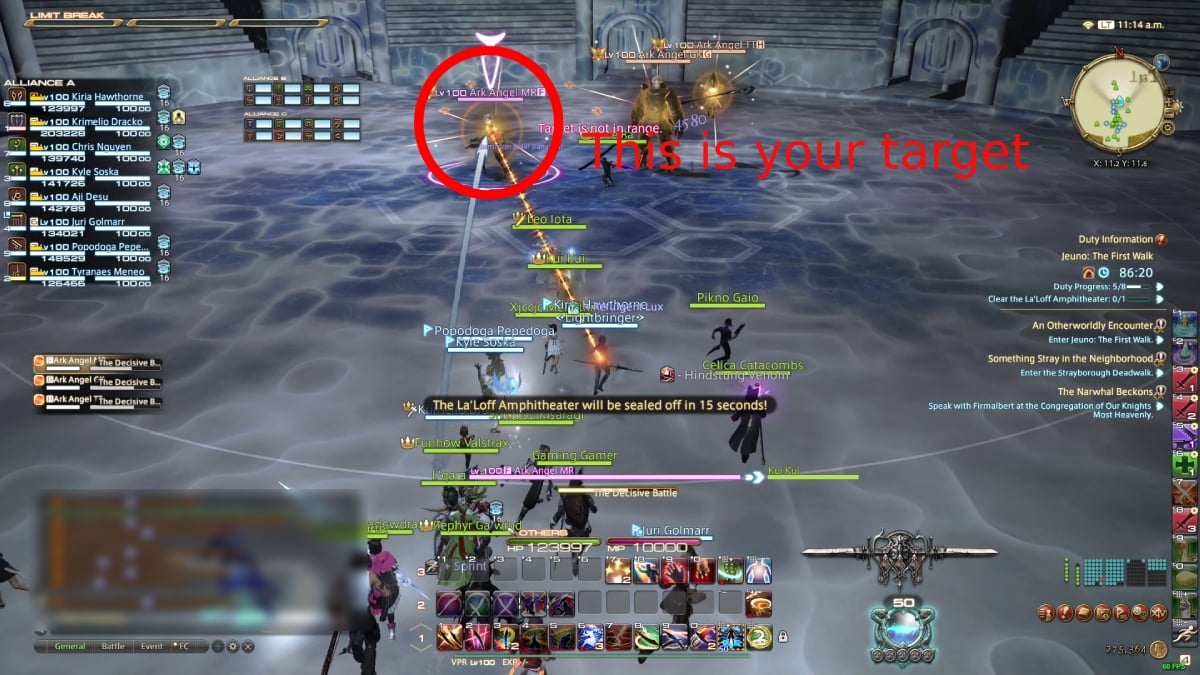
If you thought the bosses were challenging enough, wait until Jeuno: The First Walk throws five bosses at you at the same time, a new standard for Alliance Raids in FFXIV. I’m not complaining, though. The fight is quite fun. Also, since the enemies will rotate throughout the fight, it is important to pay attention to the first spell that goes off, which is The Decisive Battle. This will create a line showing you which enemy you must attack first. Attacking an enemy other than your assigned won’t work, as it will make them invulnerable against your attacks.
AoE-Fest
Due to the lack of a better phrase, I dub this phase the AoE-fest. All active bosses will fire all sorts of area-wide attacks, which you need to avoid quickly. Some might be familiar if you’ve played previous raids. Also, due to the many visual effects, I didn’t include images here because it would just make everything more confusing. Instead, I’ll go over how to evade each attack.
- Circle-shaped tank-busters.
- Tanks must spread from the party and themselves to receive the hits.
- Meikyo Shisui
- The boss will create a grid in the arena with an ice-like surface. The spots without the ice are where you should stand.
- Eye Marker
- Once you see the marker appear, look away from it to avoid damage.
- Growing Lotus Marker
- A lotus-like pattern will appear somewhere on the battlefield, and it will slowly grow. Run to the edges to avoid the attack.
- Cone-shaped Attacks
- Another attack will go off in several cone-shaped patterns. Find the safe spot between the cones.
- Petal Marker
- The final attack will feature petals moving inward to create a small circle. Stay inside this area to evade the AoE move.
- Havoc Spiral
- You’ll get another cone-shaped attack, but this time, it will spin around the arena. Pay attention to its rotation and run at the same time as the attacks go off. The last attack will follow up with a pushback, so stay close to the boss to avoid the arena’s edges.
- Guillotine
- The most dangerous move is Guillotine, and it will have one Ark Angel slowly cast it before throwing large AoE attacks in quick succession. Locate the caster and stand behind them.
Should you survive this conundrum, the next phase will begin.
Mighty Strikes
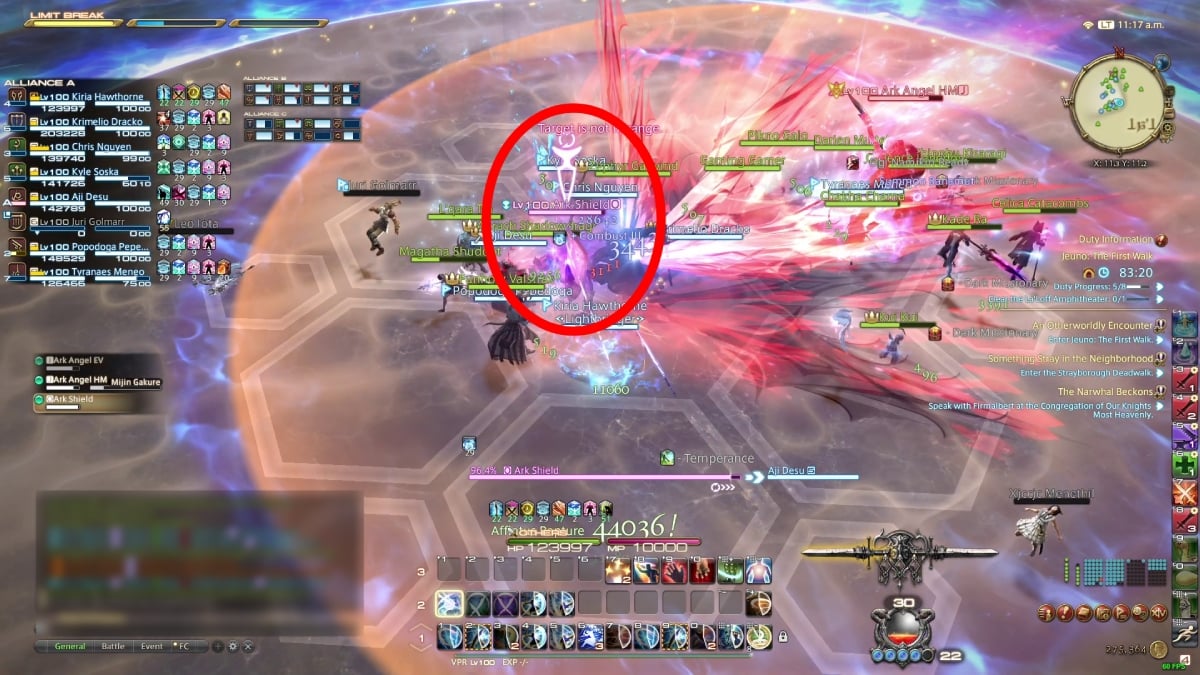
You’ll notice a new marker with the icon of a person running. If you have the market, one of the bosses will run toward you and deliver an insta-kill hit. To avoid this, you need to bait the enemy into the AoE attacks that will fall from the sky.
After that, you’ll get a cross-shaped attack with a delay, so find the safe corners to avoid it.
Break Shield & Interrupt
The next phase will have one Ark Angel raise their shield to protect the caster. You’ll see that the caster’s spell can be interrupted. However, the other boss will have a shield that must be destroyed first. If you don’t destroy the shield, it will lead to a wipe. Once you break it, have a tank interrupt the caster to proceed with the fight.
After that, the bosses will repeat the previous moves, with the exception of the shield phase. Since all the new moves are out of the way, all you have to do is dodge and stay alive. Also, you can now attack all bosses, so have the Alliance focus on one at a time to finish this encounter.
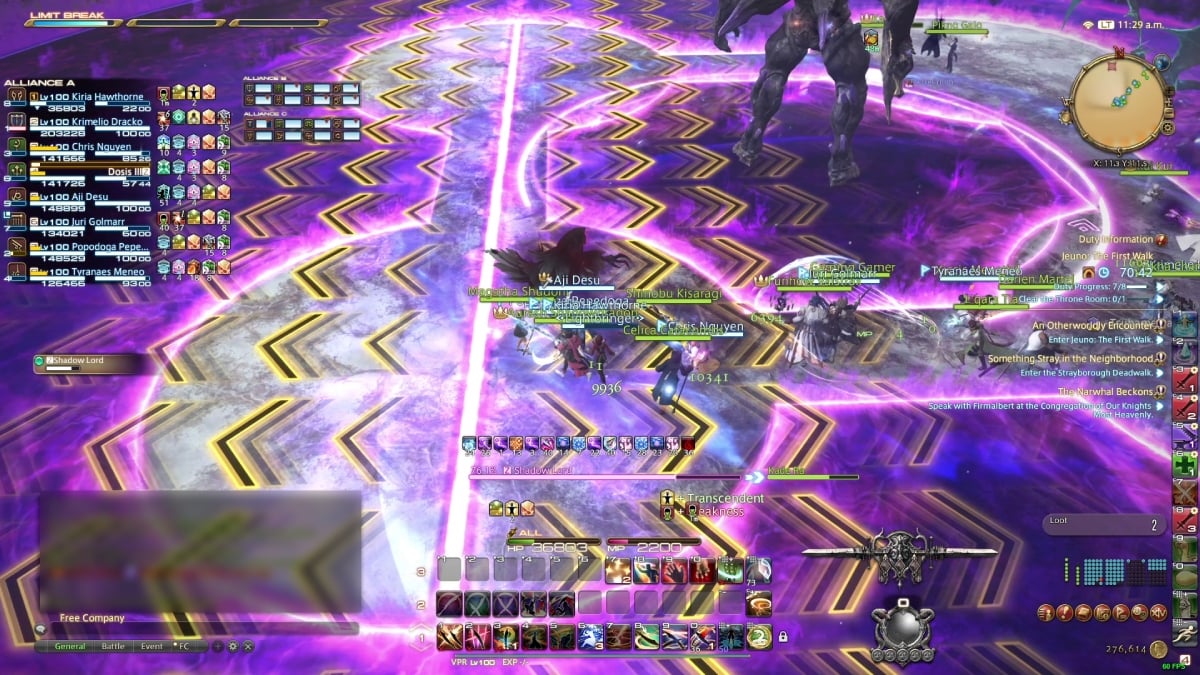
Kindred Rage: Shadow Lord
Finally, the last boss of Jeuno: The First Walk in FFXIV. As much as we love reunions with iconic FFXI characters, this fiend is the only thing standing between us and leaving this raid.
Giga Slash
Contrary to other fights, the Shadow Lord will begin with his signature Giga Slash move, which will often happen during the fight. You need to pay attention to where the curve appears next to the boss, as it is what indicates where the attack will go off.
To avoid it, stand on the opposite side of the marker and move accordingly if there’s more than one Giga Slash.
Umbra Smash
The boss will attack with his blade in four different directions. Initially, it will seem like it is easy to avoid, but there is a catch: the attack will split into smaller attacks next to the initial hit.
The easiest way to avoid this move is by waiting for the first hit to go off, letting the other two smaller attacks complete, and moving to the middle area of where the blade first landed.
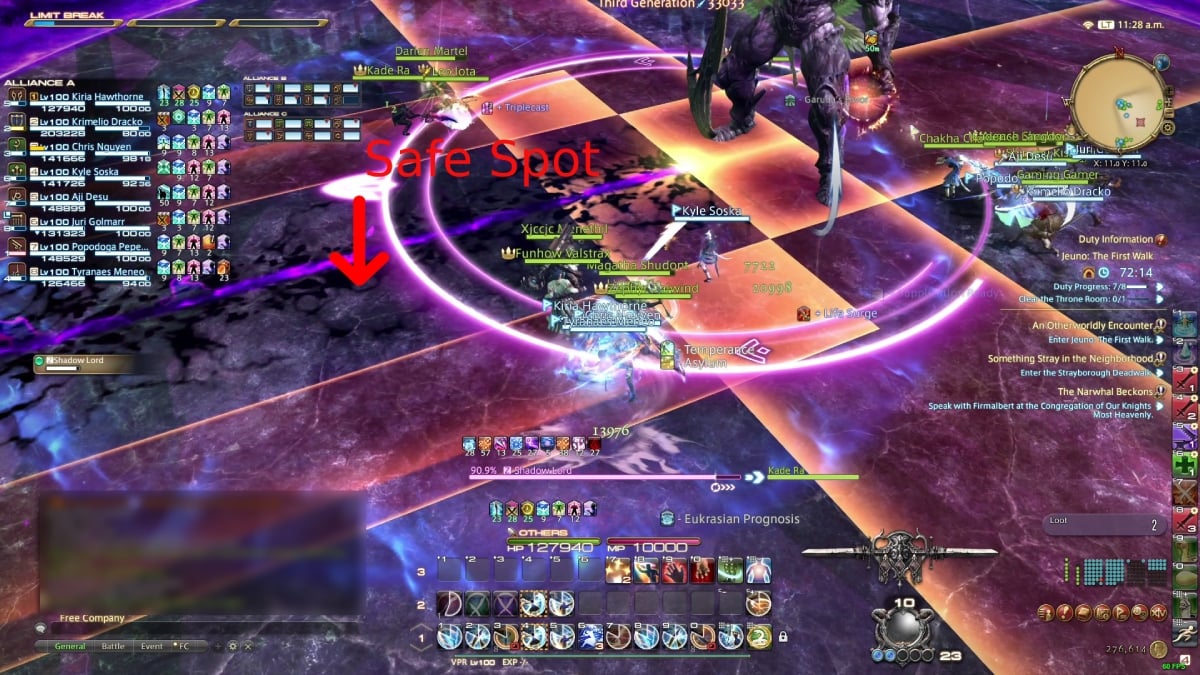
Implosion
For his next trick, the Shadow Lord will charge two balls of energy in his hands. One will go off right below him in a small circle-shaped area. However, you need to be careful of the second one. One of his two hands will hold a larger sphere. That sphere will explode in an attack that will engulf one-half of the arena.
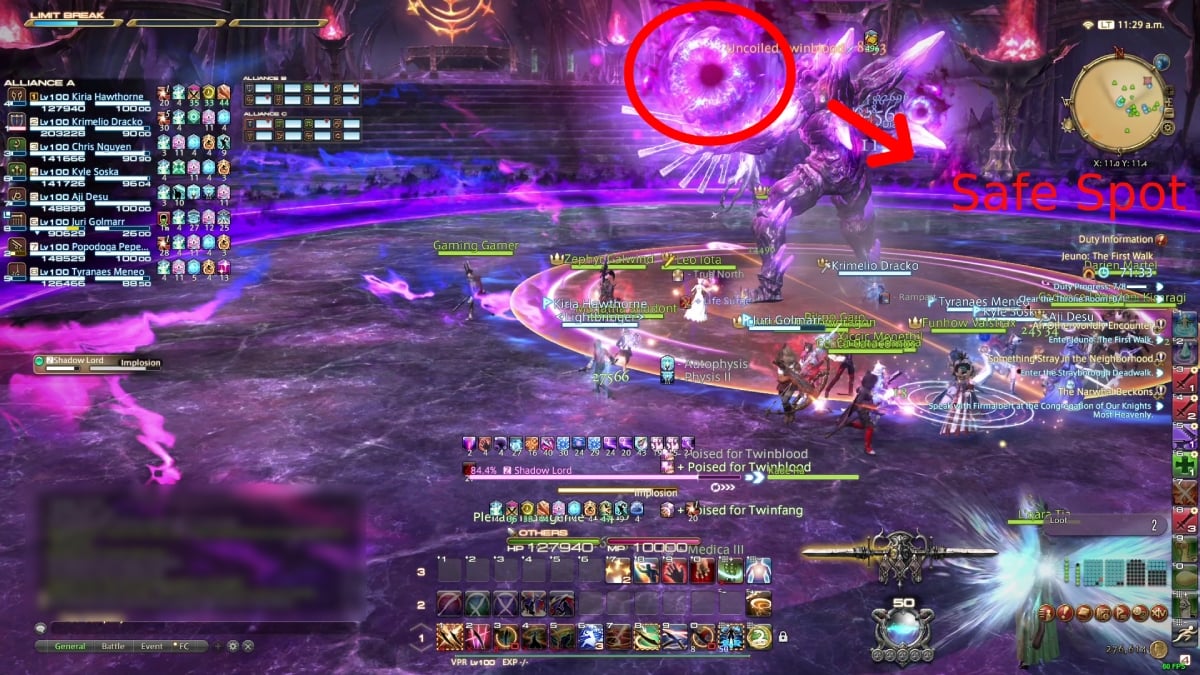
Locate the hand holding the larger sphere and run to the opposite side of it.
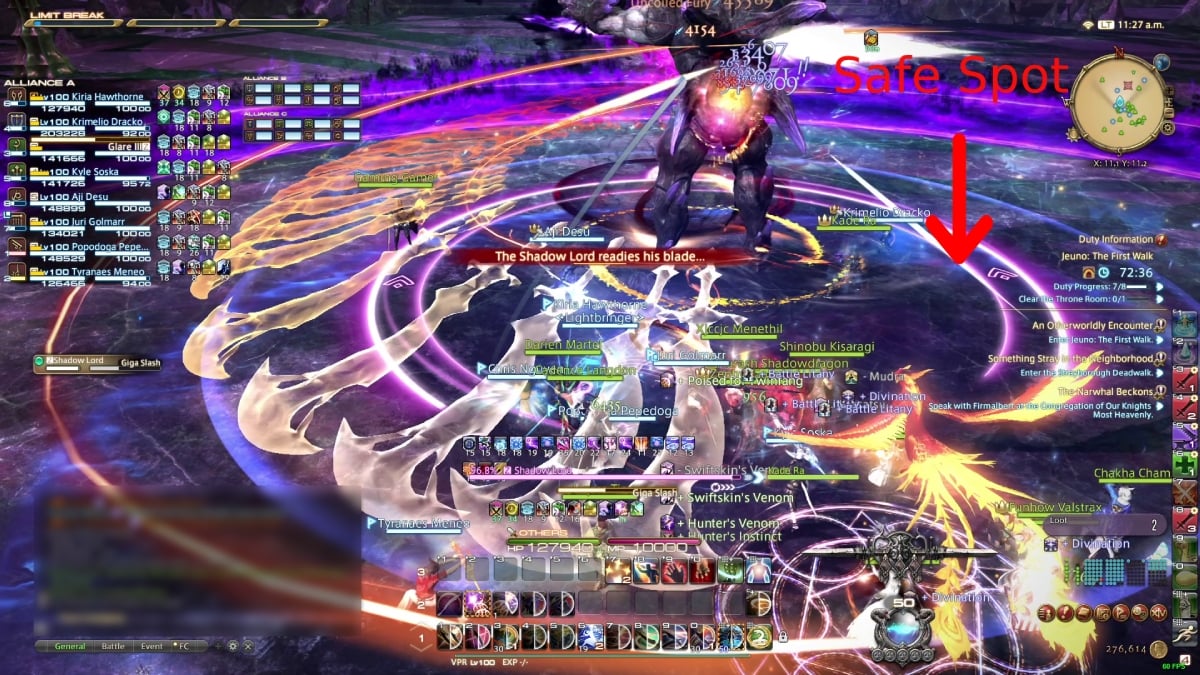
Chtonic Fury Phase
The Shadow Lord will mark a few areas of the arena, which will become unusable for a while. You must stay inside the safe zones.
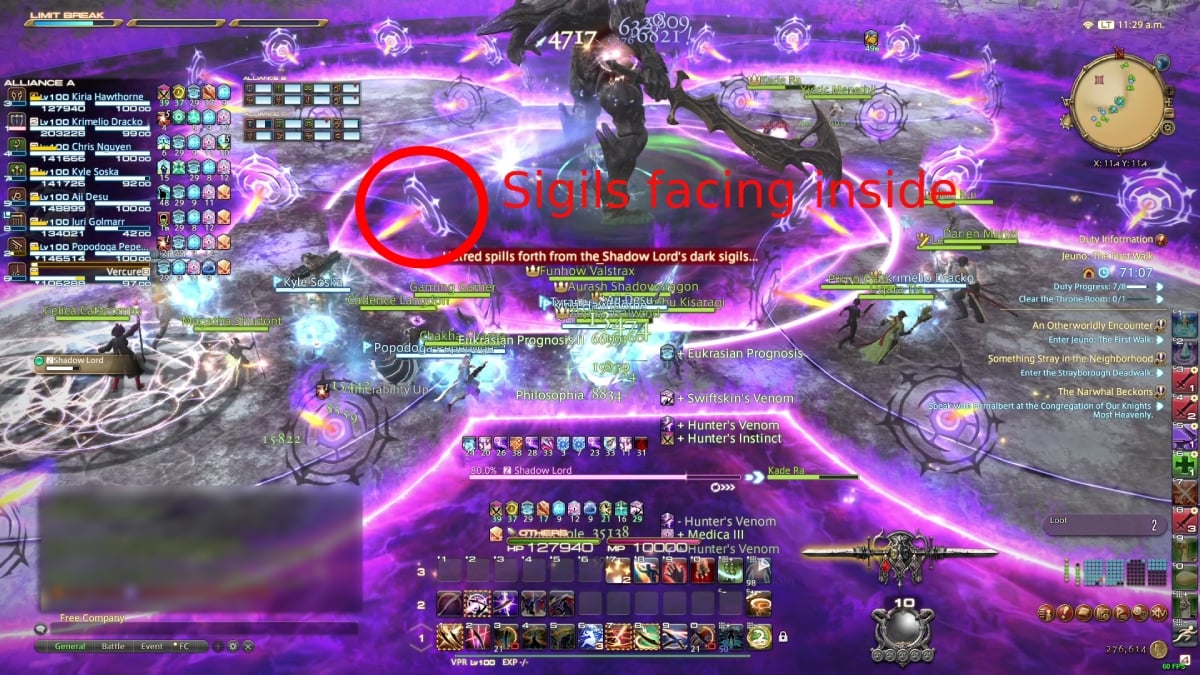
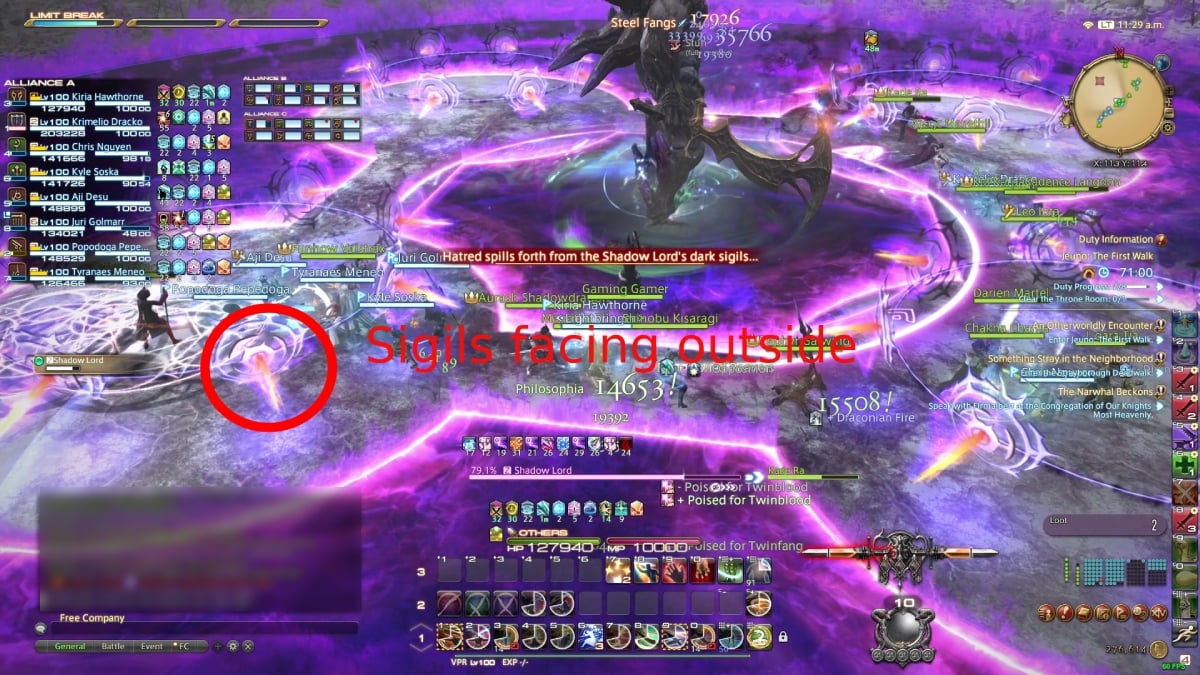
After that, you’ll get a notification saying that “hatred spills forth from the dark sigils.” Here, you need to pay attention to the markers that appear in the circles.
If the sigils are pointing to the inside of the circles, run to the lanes.
If the sigils are pointing outward, run inside the circles.
Lastly, you’ll get a pushback marker, which is easy to solve. Just position yourself next to the starting point and let yourself be pushed to the other safe zone.
Also, the boss may cast Implosion here, so remember to use the abovementioned technique to avoid all damage.
During some intervals, you’ll also see markers appearing on the lanes, making the safe zone smaller. As always, pay attention to where the sigils are pointing.
Shadow Spawn
After a heart-racing intermission, the Shadow Lord will summon clones that will cast Implosion and Giga Slash. Use the necessary techniques to avoid these moves. Usually, the Shadow Lord is the one that will cast the attacks first, followed by the clones, so pay attention to whoever raises the blade first. Also, during this phase, the boss will cast three line-shaped tank-busters, so tanks must move away from the party to bait the attacks out of the arena.
To wrap things up, the Shadow Lord will repeat Chtonic Fury and add a new move, Blinding Sigils, which spawns AoE attacks on the ground with delay. You have to memorize the order in which they appear to avoid the explosions. Other than that, it is just more clones to avoid, but with the moves you already know.


